


Real Wood Flooring Installation
Ahh..hardwood floors. Nothing says this is my space quite like a stylish well installed hard wood floor. When you are looking at this line of flooring, you should be aware that there are two distinct classes of hardwood floors that you will encounter. The first is called solid hardwood flooring and the second is referred to as engineered hardwood flooring. Both of these options come in prefinished options. Generally solid hardwood floors are also offered in an unfinished state as well.
Solid Hardwood Flooring
The first is what most people think of when they hear the phrase “hardwood floors” and that is the solid hardwood floors. These are often three quarters of an inch thick or more depending on the species. They can vary in widths from two and a half inches to as great as four or five inches. They come packaged with random lengths to help with installation and will have to be nailed down directly to your sub floor.
Engineered Hardwood Flooring
The second type of hardwood flooring you will encounter is engineered hardwood flooring. These are different from solid hardwood floors. These type of hardwood floors have a veneer of hardwood applied to a substrate of high quality engineered plywood. They can vary in thickness from as little as one half inch to as thick as one and a half inch thick. Widths can also vary from as little as three inches to as wide as six or seven inches. They are also packaged in random lengths to help with the installation process. This type of flooring can be glued or stapled down to your subfloor. How do you know what process is better. Yep, you guessed it you’ll have to read the manufacturer’s instructions.
Here are some of the Basics.
Solid hardwood strip flooring and engineered hardwood flooring can be installed over a clean, dry wood subfloor. Remember wood flooring is an agricultural product. It is affected by humidity and as a result it is best to avoid bathrooms, laundry rooms, and below-grade basements. Placing solid or engineered hardwood floors in areas of high moisture can have adverse effects on the long term durability of your flooring and its finish.
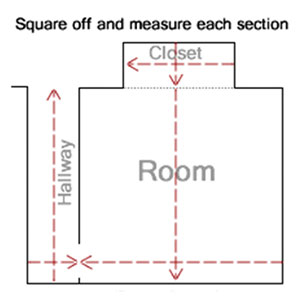
Planning Your Floor
Consider what subfloor material you have plywood or OSB and its width, which may influence the direction you choose to lay the hardwoods in the room either perpendicular or parallel to the joist substructure. Note: for concrete slab installation, engineered lumber is a better choice than solid hardwoods. Hardwood installations are most stable when they are installed perpendicular to the joists; but if your subfloor is sufficient, a parallel installation is acceptable.
Preparing the Subfloor
Ensure the subfloor is sufficiently level for installation. There should be no rises and falls more than 3/16 over a 6 foot span. If your area has any low spots they should be raised in a uniform fashion. High spots should be taken down if it is possible. This is not always an easy process and in most cases, it is optimal to raise and level out the surrounding lower spots. This is also a good time to roll out and affix your tar paper or rosin paper. You will have to staple it to your subfloor.
Acclimate the Wood
With the subfloor sufficiently leveled, acclimate the hardwoods in the space where they will be installed. Leave the hardwoods in this location for 6-7 days. Make sure not to stack the boxes, and run the A/C or heat normally. The best time to install hardwoods is the Spring and Fall when the humidity and temperatures are at yearly averages, but Summer and Winter installations are possible with the proper precautions. Never store the hardwoods where they can get wet.
Laying the First Row
When the hardwoods have been properly acclimated, it’s time to lay the first few hardwood boards.
The first board in an installation sets the tone for the remainder of the installation. Take time and do it carefully. If installed properly, the rest of the floor will practically lay itself. If installed unevenly, gaps will develop as you lay subsequent boards and you will be frustrated with the result.
Laying Hardwoods in the Field
Continue laying hardwoods throughout the floor. While the bulk of a hardwood installation is tedious but uncomplicated, a few areas can be challenging. When working around vents take your time and lay your floor out and measure carefully to all for your floor to fit around any vents. When going through a door way take your time and cut the door trim and take into consideration where you want your floor to stop. Will you be butting up to carpet, tile, or another hardwood? Do you have to trim the bottom of any doors that are in the room so they don’t damage your new floor?
Laying the Last Board
When you get to the last few boards of the hardwood installation, you will need to blind nail and then face nail the wood because the hardwood flooring stapler or nailer will not fit. After your last board is in place now is the time to prep for finishing your floor if it is not already pre-finished. As you continue to install your floor make sure you are mixing between several boxes at a time. This process helps make the natural variation blend throughout your project.
Flooring Transitions
After the floor is laid, you’ll likely need to transition to adjacent rooms and flooring surfaces, or install Stair Nosing, Trim, Baseboard, and Shoe Molding. Install baseboard and shoe molding around the perimeter of the floor to ‘frame out’ the room. This involves scarf joints, inside corners which can be cope cut, and outside corners. Quarter round can be an acceptable alternative to shoe molding if you have large gaps. If you’re laying next to kitchen cabinets, you should pick a shoe molding that matches the cabinets as opposed to the floor.
Clean and Prep Floor Subfloor
Before beginning the installation, make sure that your subfloor is clean and free of any debris. Take special care to remove any protruding nails or staples that may have been left behind from the previous floor. Vacuum, sweep and wash the floor to remove any dust. Make sure the floor has thoroughly dried after cleaning before continuing with the installation.
Roll Out Tar Paper
Roll out sheets of tar paper over the clean subfloor and use a staple gun to affix the paper to the floor. The tar paper will form a moisture barrier, which will prevent any condensation from the floors below, which could potentially rot away at the underside of your new wood flooring.
Prep the Planks for Installation
With any wood product, there will be natural color variations from piece to piece. This is a great asset to the look of the floor when the variations are consistently distributed across the space. A concern with engineered flooring, however, is that the colors may be quite uniform within an entire box, but have distinct tonal differences from one box to the next. If you were to install the floor by using all the planks from one box before opening the next, you run the risk of installing the floor with large mismatched patches of flooring. To prevent this, open multiple boxes of flooring and intermix the planks among the boxes to ensure a better blend of color as you install the floor tiles.
Install Flooring
Start by running one row along the longest wall of the room. The floor planks are tongue-and-groove style, so they should slide right together. Manufacturers recommend that you install the planks with the tongue side against the wall and the groove side facing into the room. Use a pneumatic flooring stapler to drive staples through the groove at a 45-degree angle. Put a staple every 6 to 8 inches. If you are having trouble getting the planks to slide together easily, use a rubber mallet to force them together.
Continue running rows of flooring, using different length planks to create staggered seams. When you get to the other side of the room, you will have likely trouble fitting the flooring stapler into the last row or two of flooring because of interference from the wall. If this is the case, you will need to use a finish nailer and nail directly through the face of these boards. Keep the nail holes to a minimum by putting only one nail every 12 to 18 inches.
Finish Flooring With Baseboard and Thresholds
To hide the seams where the floor meets the wall, attach a baseboard to the bottom of the wall with a finish nailer. It is easier to paint or stain the baseboard before it is installed. Use your miter saw to cut threshholds to the length of your doorway openings. Install them by simply laying them in their correct location and finish nailing them to the subfloor. As with the floor planks, use an awl to tap the nail heads down so they sit below the surface of the thresholds.

