Installation Information
Laminate
Luxury Vinyl Plank
Luxury Vinyl Tile
Floor & Wall Tile
Real Wood Flooring
GENERAL INSTALLATION TIPS FOR YOUR FLOORING.
With a few simple tools, a little hard work, and some little DIY motivation, you can release your inner handy-man and add thousands of dollars in sweat equity to the value your home.
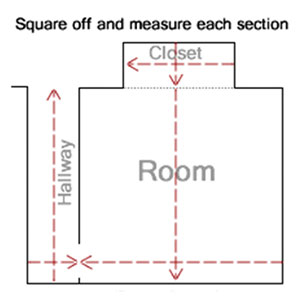
STEP 1 – MEASURE
– ROUND UP
When measuring your rooms, round up.
| Actual Measurement | Use This Figure |
| 12′ 8″ | 13′ |
| 18′ 2″ | 19′ |
| 7′ 6″ | 8′ |
– CALCULATE SQUARE FOOTAGE
Multiply Length x Width to calculate the area of your room.
10′ x 14′ = 140sqft
18′ x 26′ = 468sqft
– ACCOUNT FOR WASTE
Depending on the cuts you have to make, you will have to add a certain percentage to your order to allow for waste. Professionals agree on between 5-10%, depending on the product to be installed.
Example:
Area to Install: 500 sq ft
Wastage Estimate: 10%
500 x .10 (10%) = 50sqft
Total Order: 500sqft + 50ft (10% Waste) = 550sqft
The safest waste percentage would be 10%. With many flooring products, lines get discontinued over time, and finding matching material becomes impossible. Having few boxes on hand for needed future repairs is a smart idea
Luxury Vinyl Plank, Luxury Vinyl Tile: 5% – 8% Waste
Laminate, Solid Hardwood, Engineered Hardwood: 5% – 8% Waste
Ceramic Tile: less than 13″ X 13″: 5-8% Waste
Ceramic Tile: less than 13″ X 13″: 8-10% Waste
Carpet greater than 12 feet in width or length? Read about special measurement instructions here!
STEP 2 – ACCLIMATE
Especially important for wood products, place the product in the area where you intend to install it and allow it to sit for 48-72 hours. This will allow the product acclimate to the area where it will be installed, and shrink or swell slightly according to the humidity in your area.
This prevents the product from shrinking or swelling AFTER installation, and prevents issues with poor fitting planks and gaps in your final installation.
STEP 3 – READ THE INSTRUCTIONS!
For the DIY warrior who starts by throwing away the instructions, we recommend reviewing the manufacturers recommendations. Often there will be important tips that could save you a lot of time, money and frustration Special Instructions Carpet For Rooms Greater Than 12 Foot.

